Tuesday, January 25, 2022

Garmin Power Meter Battery Change - Vector 3S

Hope the Vector 2S battery change and tips was helpful. If you missed the article, it's here in details. For Vector 3S, the process is very similar. Vector 3S was launched in 2017, and I've been using it on my main triathlon bike since. While the newer unit does has it's advantage, Vector 3S is not without some issues. The most common issue is power spike and battery drain. There were one recall for this unit which involved the design of the battery door. Older/first generation has issues of water seeping through, which then rusted the AG13 battery inside, rendering them failing to work. Garmin has exchanged these doors for everyone that had that issue. Since then, they also came out with a solution to help with the power spikes. I will share them here today.

Vector 3S on left. Vector 2S on right, with the external sensor unit
As you can see, Vector 3S has the power sensor built into the spindle itself. This reduces external unit found on 2S. it offered a cleaner setup, almost giving the impression it's just another (Exustar) pedal. They both share similar cleat. However those of you that may have two bikes and one power meter, with the other bike.
Changing Battery On Vector 3S
Vector 3s uses two small button sized AG13 or LR44 batteries. To open the battery case, a small 4mm hex key. The batteries will fall off easily as it's not secured, so please make sure you are in an area where the replacement battery won't fall or drop somewhere you can't retrieve.
The two LR44/AG13 batteries, and the battery door, removed using a 4mm hex key

Similarly, clean all electronic contact with the alcohol solution and let it dry. don't be surprised if the contact looked dirty on your tissue paper or the cotton swab. Vector 3S is known to have these due to the circular turn of the spindle against the battery door.
Clean. Wipe. Dry.

Clean this as well. The + shows the positive battery orientation
Once you are done with this. Put a drop of mineral oil on the battery contact. This will provide a layer of lubrication for the batteries to spin/turn in the spindle. 
A drop and just dab off the excess.
Do the same on the second battery on both ends and then carefully put it back in and secure by locking with 4mm hex key. Once done, install the pedal - Drive side clockwise, non-drive side, counter-clockwise. Hand tighten, and then lock in with 1/8 turn. Good to go.
Next: Calibration
Straight forward as the Vector 3S is my main power meter. Connect the unit to your Garmin device, and scroll to Calibration page. Two presses and you are done.

Hope this is helpful, and continue to prepare you for the 2022 season. See you on the race course (and training of course!)

Tuesday, January 18, 2022

Garmin Power Meter Battery Change - Vector 2S

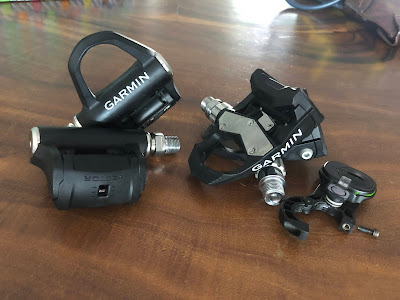
Vector 2S is a rather old model that still does it's job really well. It was first launched by Garmin in 2016. I've been using it for years, and it has helped provide the power data on my rides and races. The Vector 2s has been discontinued by Garmin. There are a lot of used and reconditioned unit out there that you can purchase for a bargain. Just make sure you find one that is still ok physically - as that is the first tell tale sign if the previous owner abused the unit and the chances of the mechanism integrity is strong (aka working) is there.

  • Click Here for My review of Vector 2S

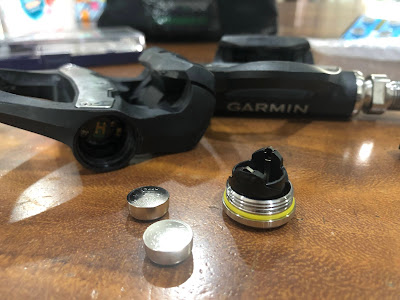
Maintenance is simple, almost no frill. A single CR2032 button cell battery last a long time, and i periodically change it only when the LED blinks red, or before a major race. Due to it's age, my unit sensor sort of detached from the casing that holds it. The glue on the inside that held the casing to the sensor unit (waterproof) dried up. It was an opportune time for me to remove the pedal, and reinstall it on my more frequently used bike, while transferring the Vector 3S to my main triathlon bike. I consider this activity I did today as "getting ready for the 2022 season".

Main unit detached from the case.
The fix for the detached unit is simple. While any glue will be sufficient, I skipped the contact adhesive (rubber glue), and superglue. Using silicon glue provide better adhesion and less issues due to heat. Silicon glue has lower possibility of getting dry and brittle. Also, superglue has solvents, which may eat into the plastic of the units. Silicon glue is not as acidic/caustic as superglue.


Simple fix. Instead of using rubber or superglue, use silicon glue as it has better adhesion and typically last longer

A small amount will do. I chose the same spot as the original adhesive was. After cleaning the casing and removing as much of the old (dried, and brittled) adhesive, the unit is ready to be place/secured back again.
I use what I have at home, in this case, Silicon glue is my main go to
A firm press on the case and sensor unit, and I am ready to go. 
Next: Changing the Battery
The Vector 2S runs on a single CR2032 battery. Same battery on the Garmin HRM. You can get them cheap from Ikea or from Mr. DIY. Keep a strip of them handy, you never know when you need them. First off, open the casing using a coin or a screw driver. I personally prefer a coin as it gives firmer leverage without damaging the battery door. Once you open it, you see the battery. I like to use a magnet (in this case, my old speed sensor magnet) to "pull" the battery out. Almost no effort. Better than trying to pry them out and risk damaging more parts.
Next, you need to clean all the metal contacts. I like to use alcohol swab. It removes any oil or grease. With Covid19 around the last 2-years, alcohol based cleaner is easy to get. I just press a little onto a tissue, and rub all the contact gently. You do not want to break anything.
Small amount, wipe and dry

metal part on the cover, wipe

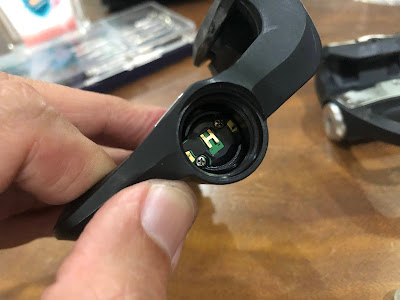
metal part in the sensor, wipe

metal contact in the pedal spindle, wipe

metal contact in the sensor attachment to spindle, wipe
Once this is done, you can put the CR2032 into the sensor unit and lock it back using the same coin. The unit LED should start blinking (anything but red). If it blinks RED, you need to change the battery again. Bear in mind that these button cells has shelf life too.
All still working well! Yes!
Next is to prepare the spindle. Some grease will always be good, to prevent any seizure/hard bonding when installed to the pedal. It is always a good practice. I have some lithium grease from my last headset installation and used just a little to line across the thread.
A little goes a long way
One of the last thing to do, before reinstalling, is to put a little bit of mineral oil (i use the light sewing machine oil) onto the spindle contact. Why? This is the part that will be in contact with the sensor unit. Putting some mineral oil (it's conductive to electronic current) will help to make the internal movement  between the spindle contact where all the power generated will be transferred to the sensor unit. This also prevent any potential power spikes when you use the unit. 
A drop, and then you just dab off some access. leave a thin film on the surface
Installation and Calibration
With this done, you can install the pedal. Remember that on the drive-side aka the crank side, you tighten clockwise like usual convention. On the non-drive side aka the left side, it is the other way around. Hand tighten both pedal and do not over tighten (typical guidance is to just hand tighten, and then give it another 1/8 turn to tightness. Once done, switch on your Garmin device, to setup the pedal and to calibrate it. Follow the on-screen instruction and you are done.
Usually happen when linking new devices. Good thing to do as it reset and restart the process for better accuracy.

After setting up the pedaling angle, it will ask you to calibrate

Clip off, and calibrate. You can actually do this by putting the bike on a stand, and free spin the setup

Hope today's tips help you to restart and be ready again for the ride and season starter. Please ask me anything if you have any issues at all. 

Next: How to Do this on Vector 3S

Monday, January 17, 2022

2022 Sports Paragon Ambassadorship - A Collaboration With Paragon Vest Malaysia

Happy New Year 2022 everyone!

Hi everyone! Happy new year! I would like to officially share the news that for this year (2022), I have been signed on as one of the Sports Paragon ambassador. If the name doesn’t ring a bell, maybe brand names such as Brooks Running, Zoot Sports and Prime may be more familiar to all of you. Yes, Sports Paragon is Paragon Vests Malaysia, sole distributors for many sports brands that some of you may had used and came across.

This year, I will be utilising Brooks Running shoes, the Zoot triathlon collections, and the Prime sports wear in my training and racing. I may from time to time, be able to share more campaigns and promotions so you my dearest readers and followers, will get a solid chance to save money while doing the sports you love. There are plentiful of sports brand and items at the Sports Paragon online store here.
The Brooks Launch8. Review here

Feel free to ask me anything of these brands. Being an user myself puts me in a very favorable position to provide actual user experiences; those of you that know my review style, will know I write based on my personal usage experience. I will continue my sharing in my social media spaces here in Instagram, Facebook Page, YouTube channel Twitter and Garmin as I engage all of you as the Key Opinion Leader (KOL), bringing technical and user reviews of these sports brand and sharing promotions and campaigns from Sports Paragon Malaysia!
The original Triathlon technical wear

To kick things off, I am sharing discount codes for online purchases for all brands under Sports Paragon, Brooks Running Zoot Sports and Prime. Sports should be affordable to everyone, and looking good is part of it! These discount codes are for your whole year 2022 purchases from Sports Paragon website, Zoot Malaysia and Brooks Running Malaysia. There are plenty of brands with different items. There will be something to suit all style, preferences and budget. Do check for item availability from time to time.
Find out more about them soon!

The specific Zoot and Brooks website carries newer models while Sports Paragon has everything, including some older models, which is why you see better discount in Sports Paragon official site.

Promo Code: SPEV02(SP)
Footwear: 55%
Apparels: 50%
Sandals: 40%
Accessories: 50%

Promo Code: EEVANOFF25 (Brooks)
25% OFF of all items ( exclude sale items )

Promo Code: ZOOTEEVAN20 (Zoot)
20% OFF Zoot website Non promo items
10% OFF Zoot website Promotion items
Together with Garmin Malaysia and Stryd Malaysia for 2022!

I will be using these hashtags a lot in my social media postings, so that will allow for easier references with like-minded individual that contribute to the community. 

#sportsparagon #Swim #Bike #Run #triathlon #zootsportsmy #brooksrunningmy #primesportsmy #sportsparagonmy #keepshowingup #runhappymy #AllWeatherRunner #keepshowingup #runhappymy #AllWeatherRunner #getfitwithsportsparagon #GarminMalaysia #BeatYesterdayMY #StrydMalaysia #RunningWithPowerMY
Bring On 2022!