Hope the Vector 2S battery change and tips was helpful. If you missed the article, it's here in details. For Vector 3S, the process is very similar. Vector 3S was launched in 2017, and I've been using it on my main triathlon bike since. While the newer unit does has it's advantage, Vector 3S is not without some issues. The most common issue is power spike and battery drain. There were one recall for this unit which involved the design of the battery door. Older/first generation has issues of water seeping through, which then rusted the AG13 battery inside, rendering them failing to work. Garmin has exchanged these doors for everyone that had that issue. Since then, they also came out with a solution to help with the power spikes. I will share them here today.
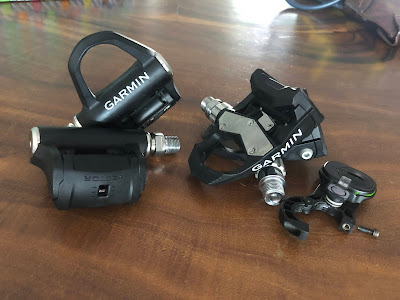 |
| Vector 3S on left. Vector 2S on right, with the external sensor unit |
As you can see, Vector 3S has the power sensor built into the spindle itself. This reduces external unit found on 2S. it offered a cleaner setup, almost giving the impression it's just another (Exustar) pedal. They both share similar cleat. However those of you that may have two bikes and one power meter, with the other bike.
Changing Battery On Vector 3S
Vector 3s uses two small button sized AG13 or LR44 batteries. To open the battery case, a small 4mm hex key. The batteries will fall off easily as it's not secured, so please make sure you are in an area where the replacement battery won't fall or drop somewhere you can't retrieve.
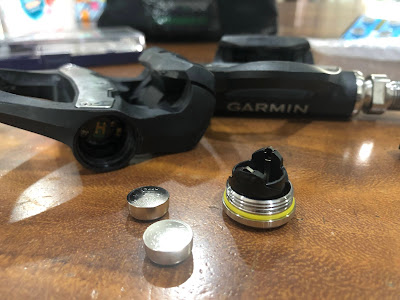 |
| The two LR44/AG13 batteries, and the battery door, removed using a 4mm hex key |
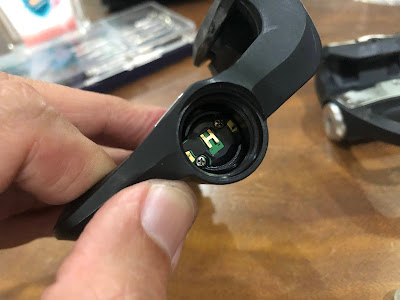
Similarly, clean all electronic contact with the alcohol solution and let it dry. don't be surprised if the contact looked dirty on your tissue paper or the cotton swab. Vector 3S is known to have these due to the circular turn of the spindle against the battery door.
 |
| Clean. Wipe. Dry. |
 |
| Clean this as well. The + shows the positive battery orientation |
Once you are done with this. Put a drop of mineral oil on the battery contact. This will provide a layer of lubrication for the batteries to spin/turn in the spindle.
 |
| A drop and just dab off the excess. |
Do the same on the second battery on both ends and then carefully put it back in and secure by locking with 4mm hex key. Once done, install the pedal - Drive side clockwise, non-drive side, counter-clockwise. Hand tighten, and then lock in with 1/8 turn. Good to go.
Next: Calibration
Straight forward as the Vector 3S is my main power meter. Connect the unit to your Garmin device, and scroll to Calibration page. Two presses and you are done.
Hope this is helpful, and continue to prepare you for the 2022 season. See you on the race course (and training of course!)


No comments:
Post a Comment